|
|
|
|
The HTML 4.0 standard introduces the new <button> tag. You to use the tag set up plain buttons, buttons with text, graphical buttons and buttons with text and pictures. You can already do most this in a form with the <input> tag but the <button> tag is easier to use and you can put almost anything inside it. Note: you can use it tag anywhere on your page, not just in a form. Here are some examples of what you can do with the <button> tag:
There are a few tags that you can't include within a button: the <button>, <select>, <input> and <a> tags. If you want the buttons to be anything other than decorative, add a bit of javascript to make some thing happen. For example: To jump to another page: <button onClick="window.location='http://www.ann.com'"> Home</button> To open a new window: <button onClick="window.open=('hints.htm')">Hints</button>
To close a window: <button onClick="window.close=()">Close</button> If you want to use the <button> tag in a form, use the type attribute to tell the browser what to do when you click the button. You can set up a submit, a reset or a plain button which simply presses in and out. Here are some examples that create submit buttons but you could set up reset buttons in a similar way. To create a button with text:
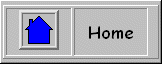
To create a graphical button put the <img> tag within the <button> tag:
This is the same as using <input type="image" SRC="go.gif">. You can also create a button with text and graphics:
Note that you can also use the name and value attributes in the same way as for the <input> tag. See Submit and reset buttons for more details. If you create a button with the type set to "button", you create a button that presses in and out. You can use them to kick off a script or applet. |
More information The button tag |